Monday, November 24, 2008

How to Install Bluetooth Adapter IVT BlueSoleil in Microsoft Windows XP

[BAHASA INDONESIA]

Here I will show you step by step how to install a Bluetooth adapter IVT Bluesoleil in Windows XP. The steps are as follows:

Insert the CD Bluetooth driver you get from the package of purchase or if the Bluetooth driver file you save in hard disk drives, please open the folder where the driver bluetooth saved. In the following instructions I use the bluetooth driver stored in the hard disk


(2) Doubleclick bluetooth drivers folder. In this instance the bluetooth driver stored in a folder called Driver Bluetooth in drive C: \


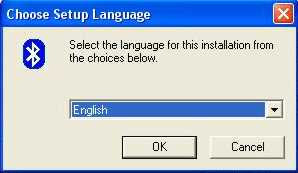
(3) When the folder opens, please find the file Setup with the type Application. Doubleclick setup file to begin the installation process. Please select Setup Language: English and press OK


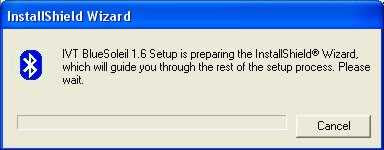
(4) It will display Installshield Wizard that will guide you through the installation process


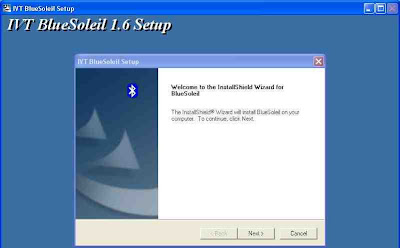
(5) Please press the Next> button to continue the installation process

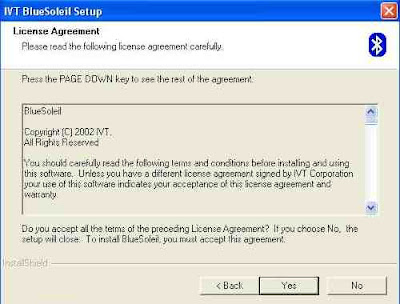
(6) Furthermore, will appear License Agreement window. Please press the Yes button to continue the installation process


(7) You will then be asked to determine Destination Folder that is the folder where the Bluetooth drivers will be installed. You can leave only by default, which means that you accept to install in the folder C: \ Program Files \ IVT Corporation \ BlueSoleil. If you accept the default folder that has been determined please you press the Next> button
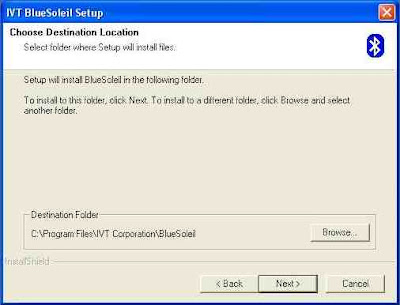


(8) Installation process will run and will be displayed Setup Status
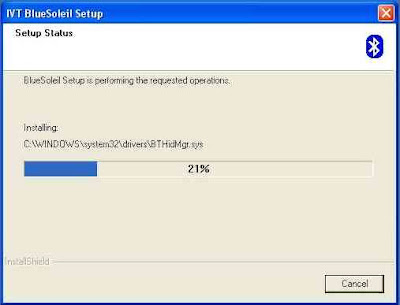


(9) When Setup Status reached 100%, next appear Preparing Bluetooth drivers, which means that bluetooth driver installation will start soon


(10) Furthermore appear Updating Bluetooth USB Drivers


(11) When Updating Bluetooth USB Drivers completed, will continue with the Installing Bluetooth Audio Device..


(12) When Installing Bluetooth Audio Device .. completed next will appear Installing Bluetooth Network Adapter..


(13) When Installing Bluetooth Network Adapter .. completed next will appear Installing Bluetooth Human Interface Device..


(14) When Installing Bluetooth Human Interface Device .. completed next will appear Installing Bluetooth Virtual Serial Ports..


(15) When Installing Bluetooth Virtual Serial Ports .. completed next will appear Installing Bluetooth Modem..


(16) After Installing Bluetooth Modem .. completed, the process Installshield Wizard Complete. This means all of Bluetooth adapter installation process has been completed. Choose Yes, I want to restart my computer now. And then click the Finish button
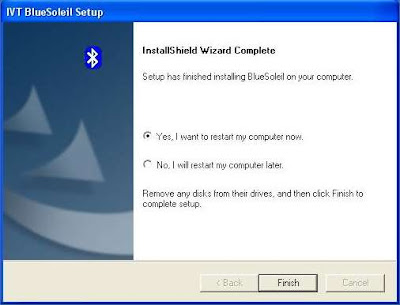


After you click the Finish button, the computer will restart.

(17) After the restart process is completed, please try to run the IVT BlueSoleil application. Click Start> IVT Bl ueSoleil> BlueSoleil or can be accessed via the desktop shortcut BlueSoleil. Interface IVT Corporation BlueSoleil will appear as in the picture below:
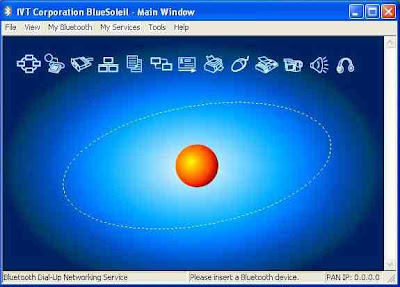


Please plug in the Bluetooth devices to the computer's USB port. When Ready status appear it means the bluetooth adapter is ready to use.

Please activate your bluetooth device you may have, for example, mobile phone with bluetooth to try. Then do the pairing process to find the bluetooth devices around your computer. So will appear all existing Bluetooth device within range bluetooth computer. See the picture below. In the picture below, the Nokia 6275i phone successfully detected.


After everything is installed correctly and running normal, then the Bluetooth adapter can be used to transfer files, access the Internet and connect to other Bluetooth devices.

Done ..

Hopefully useful for you. Thanks


[ Baca Selengkapnya... ]

Friday, November 21, 2008

Petunjuk Instalasi Bluetooth Adapter IVT BlueSoleil di Microsoft Windows XP

[ENGLISH]


Berikut ini akan saya tunjukkan langkah demi langkah cara instal bluetooth adapter IVT Bluesoleil di Windows XP. Langkah-langkahnya adalah sebagai berikut:

(1) Masukkan CD driver Bluetooth yang diperoleh dari paket pembelian atau jika file Bluetooth driver sudah anda simpan di drive harddisk, silahkan buka folder tempat driver bluetooth tersimpan. Dalam petunjuk berikut ini saya menggunakan driver bluetooth yg sudah disimpan dalam harddisk


(2) Dobelklik folder Driver Bluetooth. Dalam contoh ini driver bluetooth tersimpan dalam folder bernama Driver Bluetooth di drive C:\


(3) Setelah folder tersebut terbuka, silahkan anda cari file Setup dgn type Application. Dobelklik file Setup tersebut untuk mulai proses instal. Silahkan anda pilih Setup Language: English dan tekan OK


(4) Akan ditampilkan Installshield Wizard yang akan memandu anda dalam proses instalasi


(5) Silahkan tekan tombol Next> untuk melanjutkan proses instalasi

(6) Selanjutnya akan tampil License Agreement. Silahkan tekan tombol Yes untuk melanjutkan proses instalasi


Anda selanjutnya akan diminta untuk menentukan Destination Folder yaitu folder dimana Bluetooth driver akan diinstal. Anda dapat membiarkan saja secara default yang berarti anda menerima untuk menginstal di folder C:\Program Files\IVT Corporation\BlueSoleil. Jika anda menerima folder default yang telah ditentukan silahkan anda tekan tombol Next>


(8) Proses instal akan berjalan dan akan ditampilkan Setup Status


Setelah Setup Status mencapai angka 100%, selanjutnya muncul Preparing Bluetooth driver yang berarti instalasi driver bluetooth akan segera dimulai


(10) Selanjutnya muncul Updating Bluetooth USB Drivers


(11) Setelah Updating Bluetooth USB Drivers selesai, selanjutnya akan dilanjutkan dengan Installing Bluetooth Audio Device..


(12) Setelah Installing Bluetooth Audio Device..selesai selanjutnya akan muncul Installing Bluetooth Network Adapter..


(13) Setelah Installing Bluetooth Network Adapter..selesai akan dilanjutkan dengan Installing Bluetooth Human Interface Device..


(14) Setelah Installing Bluetooth Human Interface Device..selesai akan dilanjutkan dengan Installing Bluetooth Virtual Serial Ports..


(15) Setelah Installing Bluetooth Virtual Serial Ports..selesai akan dilanjutkan dengan Installing Bluetooth Modem..


(16) Setelah Installing Bluetooth Modem.. selesai , proses Installshield Wizard Complete. Ini berarti seleuruh proses instalasi bluetooth adapter telah selesai. Pilihlah Yes, I want to restart my computer now. kemudian klik tombol Finish


Setelah anda mengklik tombol Finish, komputer akan restart.

17) Setelah proses restart selesai, Selanjutnya silahkan anda coba jalankan aplikasi IVT BlueSoleil. Klik Start> IVT Bl ueSoleil> BlueSoleil atau dapat juga diakses via shortcut BlueSoleil di desktop. Akan tampil interface IVT Corporation BlueSoleil seperti pada gambar berikut ini:


Silahkan anda colokkan Bluetooth device ke dalam port USB komputer. Setelah statusnya Ready maka bluetooth adapter sudah siap anda gunakan. Untuk mencobanya silahkan anda aktifkan perangkat bluetooth yg anda miliki, misalnya ponsel berbluetooth. Kemudian lakukan proses Pairing untuk mencari perangkat bluetoth yg ada disekitar komputer anda. Maka akan ditampilakan semua perangkat bluetooth yg ada dalam jangkauan bluetooth komputer. Lihat gambar dibawah. Dalam gambar bawah terlihat bahwa ponsel Nokia 6275i berhasil terdeteksi.


Setelah semuanya terinstal dengan benar dan berjalan normal, maka bluetooth adapater sudah dapat digunakan untuk transfer file, akses internet dan koneksi ke perangkat bluetooth lainnya.

Selesai.. Semoga bermanfaat bagi anda

[ Baca Selengkapnya... ]

Thursday, October 9, 2008

Panduan setting email POP3 yahoo.co.id pada Microsoft Outlook Express

Pengguna Surat Yahoo! dapat menggunakan Outlook Express atau klien POP3 lainnya untuk mengakses dan mengelola pesan Surat Yahoo! mereka.

Outlook Express memungkinkan Anda untuk menambahkan akun email baru ke profil yang sudah ada. Ini berarti Anda tidak perlu mengganti setelan saat ini untuk mengirim dan menerima pesan Surat Yahoo!.
Begini caranya:

1. Dari menu Tools, pilih “Accounts.”
2. Pilih tab “Mail.”
3. Klik tombol “Add”.
4. Dari menu Add, klik “Mail.”
5. Pada kotak teks berlabel Display Name, ketik nama Anda dan klik “Next.”
6. Pada kotak Email Address, ketik alamat Surat Yahoo! Anda (pastikan untuk mencantumkan “@yahoo.co.id”) and click “Next.”
7. Di bawah “My incoming mail server is a...” pilih “POP3.”
8. Ketik “pop.mail.yahoo.com” pada kotak Incoming Mail (POP3, IMAP, atau HTTP) Server.
9. Ketik "smtp.mail.yahoo.com" pada kotak Outgoing Mail (SMTP) Server.
10. Klik “Next.”

11. Dalam kotak Account Name, ketik ID Surat Yahoo! Anda (alamat email Anda tanpa “@yahoo.co.id”).
12. Pada kotak Password, ketik sandi Surat Yahoo! Anda.
13. Jika Anda ingin Outlook Express mengingat sandi Anda, centang kotak “Remember password.”
14. Jangan mencentang kotak berlabel "Log on using Secure...”
15. Klik “Next.”
16. Klik “Finish.”

Penting: Sekarang server SMTP Surat Yahoo! memerlukan autentikasi. Untuk mengaktifkan setelan ini:

1. Dari menu Tools, pilih “Accounts.”
2. Pilih tab “Mail.”
3. Klik dua kali akun berlabel “pop.mail.yahoo.com.”
4. Pilih tab “Servers.”
5. Centang kotak di sebelah "My Server Requires Authentication."
6. Klik “OK.”

Untuk mengendalikan penghapusan surat dari server Surat Yahoo!:

1. Dari menu Tools, pilih “Accounts.”
2. Pilih tab “Mail.”
3. Klik dua kali akun berlabel “pop.mail.yahoo.com.”
4. Pilih tab “Advanced.”
5. Pada bagian Delivery di bagian bawah jendela, centang “Leave a copy of messages on server” jika Anda ingin menyimpan pesan Surat Yahoo! pada server Surat Yahoo! selain juga pada komputer lokal Anda. Jangan mencentang kotak ini jika Anda ingin surat dihapus dari server Surat Yahoo! setelah Anda menerimanya di Outlook Express.

Jika ISP Anda memblokir port 25 atau jika Anda tidak bisa mengirimkan email, maka Anda harus menggunakan port 587 apabila mengirimkan lewat server SMTP Yahoo!. Untuk melakukan perubahan ini, ikutilah petunjuk berikut:

1. Dari menu Tools, pilih “Accounts.”
2. Pilih akun POP Yahoo! dan klik tombol “Properties.”
3. Klik tab “Advanced.”
4. Di samping “Outgoing server (SMTP), ubah port 25 menjadi 587

Klik “Apply,” lalu klik “OK” dan “Close”

Catatan:
Untuk dapat menggunakan akses POP3 anda harus mengaktifkan terlebih dahulu email yahoo anda dengan masuk ke Options – Penerusan dan Akses POP. Setelah itu silahkan anda lakukan pengaturan dalam program Outlook Express anda. Panduan setting terperinci tentang Penerusan dan Akses POP silahkan klik disini

[ Baca Selengkapnya... ]

Reader Community

PESAN TEMAN


ShoutMix chat widget
 
This Blog is proudly powered by Blogger.com | Template by Angga Leo Putra